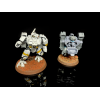
Answering the question of how does a pilot actually fit inside a battlesuit. The front hatch is hinged so the suit can be opened to see the pilot in the suit.
Includes:
Two main torsos and front hatches with hinge variants
Peg system. This is printed in two parts and then glued around the hinge.
Rod system. This one has a hole through the hinge. The hole is sized for a standard paper clip for strength, but a matching rod is also provided.
Three pilot options.
· With VR helmet
· Without helmet
· Without head (so you can add one of your preference – either digitally or using official parts)
Pelvis – This is needed since the connection point in the official kit fills the majority of the torso’s interior cavity. I sized down this connection to make room for the pilot.
There are also two torso variants with the helmeted pilot combined to the torso geometry. This is for ease of printing – some resin printers create brittle prints, and if the pilot is part of the suit geometry it should be more robust.
Included in the model are spots for 2x1.5mm (5/64 x 1/16 inch) magnets: One in the torso and one in the hatch. This allows for a more reliable hold when the hatch is closed.
I only have an FDM printer, so the test prints look a little rough, but I wanted to illustrate that I've tested most models with prints. All models were tested in the Cura and Lychee slicing software.
All models are one watertight surface and should work on all FDM and Resin printers.


